
If you have a leaking ceiling, you can prevent it from causing further damage to your home by catching the water immediately. Next, fix the leaking ceiling as quickly as possible by taking a screwdriver to the hole and tightening the screws. To avoid causing more damage to already weakened areas, always keep the leak in a downward direction. The water should flow down towards the drain, preventing further damage to your ceiling.
Understanding Ceiling Leaks: Causes and Preventions
Ceiling leaks, a common household issue, can cause significant damage if not promptly addressed. The primary causes of ceiling leaks include damaged roofing, compromised waterproofing, or plumbing issues. To prevent these problems, regular maintenance and inspections are necessary. For example, it is crucial to ensure that the roof is in good condition, especially after severe weather. Additionally, regularly checking for any signs of water damage or dampness can help catch leaks early, preventing more extensive damage. It is also wise to ensure proper attic ventilation and insulation, as these measures can reduce the risk of leaks caused by condensation.
When it comes to addressing ceiling leaks, it is important to take immediate action. Ignoring the issue can lead to further damage and costly repairs. If you notice any signs of a leak, such as water stains or dripping water, it is essential to identify the source and fix it as soon as possible. Depending on the cause of the leak, you may need to hire a professional roofer, plumber, or waterproofing specialist. They will be able to assess the situation and provide the necessary repairs or replacements. Remember, addressing the problem promptly can save you time, money, and headaches in the long run.
Prevention is key when it comes to ceiling leaks. Regular maintenance and inspections can help identify potential issues before they become major problems. It is recommended to have your roof inspected at least once a year, especially after severe weather events. During the inspection, the roofing professional will check for any signs of damage, such as missing or damaged shingles, cracks, or deteriorated flashing. They will also assess the condition of the waterproofing membrane and ensure that it is properly sealed. Additionally, it is important to regularly check your attic for any signs of water damage or dampness. This can indicate a leak in the roof or plumbing system. By addressing these issues early on, you can prevent more extensive damage and costly repairs.
Proper attic ventilation and insulation are crucial in preventing ceiling leaks caused by condensation. When warm air from your home rises to the attic, it can condense on the cooler surfaces, such as the underside of the roof deck. This can lead to moisture buildup and eventually result in leaks. To prevent this, it is important to ensure that your attic is well-ventilated. This can be achieved by installing vents or fans that allow air to circulate freely. Additionally, proper insulation can help regulate the temperature in the attic, reducing the risk of condensation. It is recommended to consult with a professional to determine the best ventilation and insulation options for your specific home. Learn more about home maintenance
The Importance of Professional Assessment for Ceiling Leaks
In some cases, it’s wise to seek a professional assessment for a ceiling leak. Professionals can identify the exact cause of the leak and suggest the most effective solutions. This is particularly important if the leak is due to structural issues or complex plumbing problems. A professional can also assess the extent of water damage and suggest necessary repairs to prevent future issues. In cases of severe leaks, they can provide emergency services to prevent further damage to your property.
However, if the ceiling leak is a minor one, you may be able to fix it yourself by following certain procedures, though it would still be best to get a professional opinion. It is also a good idea to maintain your property regularly to prevent leaks in the first place. Conduct regular inspections to identify any potential signs of leakage and nip those problems in the bud.
But challenges arise when leaks are concealed within the walls or above the ceiling, out of sight. In such instances, only a professional equipped with the appropriate tools can recognize the early warning signs. This may include wet spots on the walls, ceiling discoloration or a dripping sound even in the absence of rain.
In addition to providing a higher quality of resolution, hiring a professional ensures that future recurring issues are minimized to an extent. And while the upfront costs of hiring professionals might seem daunting, they can save you money in the long run by accurately diagnosing and fixing problems, preventing further costly damage.
Once a professional resolves the ceiling leak issue, they can also provide advice on preventive maintenance. This might include regularly checking the quality of your roof materials, ensuring that plumbing systems are functioning properly, and that your drainage systems are not blocked or damaged. Find professional home repair services
Preventative Measures to Avoid Future Ceiling Leaks
Preventative measures are key to avoiding future ceiling leaks. Regular roof inspections, especially after severe weather conditions, can help identify potential problems early. Ensuring good attic ventilation and insulation can prevent condensation-related issues. Regular plumbing checks can also prevent leaks due to pipe damage or wear. Additionally, using quality waterproofing materials during construction or renovation can provide long-term protection against leaks. Adopting these preventative measures can save time, money, and the inconvenience of dealing with unexpected leaks in the future.
In many homes, the majority of ceiling leaks can be traced back to issues with the roof. Detecting these potential problems early on can often limit the extent of the damage and associated repairs. Roof inspections should particularly focus on previous repair sites, roof flashing areas, and spots where water routinely collects after a rainfall. Prolonged contact with water can lead to weakening of the roof materials and ultimately a leak.
The attic is another crucial area that requires attention. It must be well ventilated and insulated to avoid the build-up of moisture, which can lead to mold, mildew, and wood rot. Inadequate ventilation can lead to hot spots in the summer and cooler spots in the winter, causing condensation and frost. Over time, this moisture can seep through causing leaks.
Plumbing is yet another potential source of leaks. Regular plumbing checks are essential, particularly if your home is older. As time passes, the integrity of copper pipes can degrade due to corrosion. Plastic pipes can also become brittle and break. Regular inspections and maintenance will minimize these potential leaks.
Finally, it is important to stress the use of high-quality waterproofing materials during construction or home renovations. Though it might be tempting to cut corners to save money, this step is critical in safeguarding your home against leaks.
Adhering to these preventative measures can significantly reduce the likelihood of encountering leaks and the accompanying frustration. In addition, these actions can help prevent the possible health hazards associated with damp and moldy conditions, ultimately creating a safer and more comfortable home environment. Not only will you be saving time and money in the short term, but also preserving the value and integrity of your property in the long term. Learn about preventative home care
Recognizing the Signs of a Serious Ceiling Leak
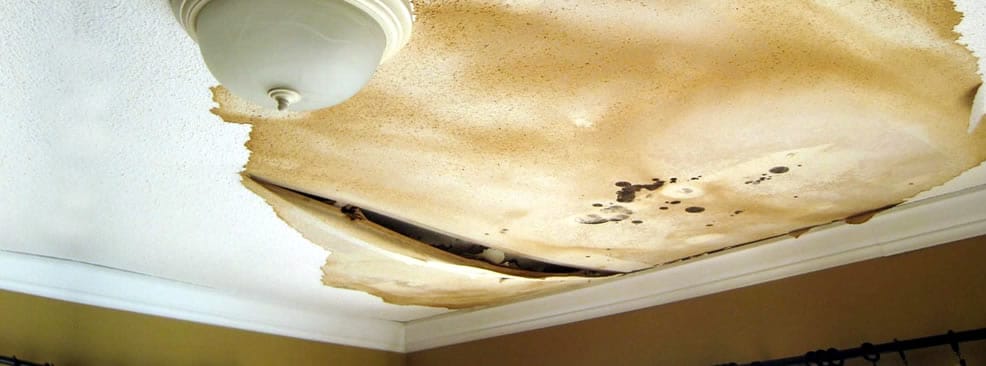
Recognizing the signs of a serious ceiling leak is crucial in preventing extensive damage. If you notice any water stains on the ceiling, peeling paint, or a sagging ceiling, it’s important to investigate further and address the issue immediately. Additionally, visible dripping or musty odors can signify a leak, indicating potential mold and mildew growth. It’s essential to be proactive and not dismiss these signs as minor issues. Taking prompt action can help prevent further damage and costly repairs down the line.
When it comes to identifying a ceiling leak, water stains on the ceiling are a common indicator. These stains can vary in size and shape, and they often appear as discolored patches on the surface. Peeling paint is another sign to look out for, as water infiltration can cause the paint to bubble, crack, or peel away from the ceiling. A sagging ceiling is also a red flag, suggesting that water has seeped into the structural components and weakened the integrity of the ceiling. These visible signs should not be ignored, as they can worsen over time and lead to more significant issues.
In addition to visible signs, other clues can help you detect a ceiling leak. If you notice water dripping from the ceiling, it’s a clear indication that there is a leak somewhere above. This dripping may be intermittent or continuous, depending on the severity of the leak. Furthermore, musty odors in the affected area can be a sign of hidden water damage. These odors result from the growth of mold and mildew, which thrive in damp environments. If you detect any musty smells, it’s crucial to address the issue promptly to prevent further mold growth and potential health hazards.
It’s important to remember that even a small water stain or a faint musty odor can be indicative of a more significant problem behind the scenes. Sometimes, the visible signs are just the tip of the iceberg, and there may be hidden water damage or structural issues that require immediate attention. Ignoring these signs or delaying repairs can lead to more extensive damage, increased repair costs, and potential safety hazards. Read more about home damage signs
Step-by-Step Guide to Repairing a Leaking Ceiling
Repairing a leaking ceiling involves several steps. Firstly, identify the source of the leak. This could be a damaged roof, a plumbing issue, or even condensation. Once identified, the next step is to contain the leak to prevent further damage. This might involve placing buckets or towels to catch dripping water. Following this, repair the source of the leak, which could involve patching up a roof or fixing a pipe. After addressing the source, repair the ceiling itself. This could include drying out the area, replacing damaged plaster or drywall, and repainting. It’s important to ensure that the area is completely dry before carrying out repairs to prevent mold growth.
The continuation of the repair process involves assessing the situation thoroughly. This implies determining the extent of the damage and considering the repair approach that would be most effective. If the leak was caused by a minor hole or crack in the roof, a simple roofing patch could suffice. However, in case of severe damage that is beyond simple patchwork, it might be necessary to replace entire sections of the roof.
If the source is a plumbing issue, turning off the water supply might be a needed measure in order to mitigate the situation. If you’re unable to locate or reach the water valve, consider calling a licensed plumber for assistance. Repairing a damaged pipe can range from applying epoxy putty to a slight crack or perhaps replacing a pipe section altogether.
When addressing the ceiling damage, it’s crucial to take safety precautions. Wear gloves and goggles for protection. Aggravated water damage may have weakened the ceiling structure, hence caution must be taken during the handling process. If the area is larger, you may need to put up a new ceiling drywall aligning it properly with support beams or joists.
Once the area has been repaired and dried completely, repainting the ceiling is the final step. First, apply a stain-blocking primer to prevent any water stains from bleeding through the new paint. Allow the primer to dry before painting over it with the color matching the rest of your ceiling. Find more DIY home repair tips
Mold growth in a leaking ceiling
It is not unusual for a leaking ceiling to support mold growth. Mold is a fungus that grows on wet surfaces and feeds on organic matter. It may be white, black, green, or orange. It can be found in most environments and thrives in humid conditions. Whether the water leaks are caused by an appliance or plumbing failure, mold is a likely culprit. In addition to a leaking ceiling, mold can also form on walls, furniture, and picture frames.
Since ceilings are directly under the roof, mold spores grow on the inside of a structure. It is, therefore, difficult to detect this growth without tearing down the ceiling. Ideally, a visual inspection of the ceiling is sufficient. However, if there are signs of a roof leak, a cracking ceiling may also be an indicator. In such cases, a professional mold abatement expert will be able to remove the present mold and replace the infected drywall.
It may be time to call a professional if you notice visible signs of mold growth. If the mold has grown on the ceiling, you should get it cleaned by a professional. Mold growth in a leaking ceiling is an indicator of a larger problem. While cleaning does remove the mold, it will not solve the underlying cause of the problem. A roof leak causes extreme dampness in the attic, which can spread throughout the house.
Key Considerations when Fixing a Leaking Ceiling in Your Home in Metro Vancouver.
Expertise in Roof Repair and Water Damage Restoration:
A primary consideration is the business’s expertise in roof repair and water damage restoration, as these are crucial components of fixing a leaking ceiling. Look for a company with a proven track record in handling similar issues. Expertise in these areas ensures that the business can accurately diagnose the root cause of the leak, whether it’s due to damaged shingles, clogged gutters, or inadequate waterproofing, and provide an effective solution.
Certifications and Licensing:
Ensuring that the business is certified and licensed is vital. Certifications from reputable organizations in home repair and maintenance demonstrate a commitment to industry standards and ongoing training. Licensing, on the other hand, assures that the business is recognized and regulated by local authorities, adding a layer of trust and reliability.
Customer Reviews and Testimonials:
Customer reviews and testimonials are invaluable in gauging the business’s reliability and quality of work. Look for feedback on various aspects like timeliness, professionalism, effectiveness of the repairs, and customer service. High ratings and positive testimonials are strong indicators of a business’s reputation in handling leaking ceiling repairs.
Insurance and Warranty Offerings:
A business that offers comprehensive insurance and warranty on their work is preferable. Insurance protects against any accidental damage during the repair process, while a warranty assures the longevity and effectiveness of the repairs. This not only provides peace of mind but also ensures accountability from the business.
Cost-Effectiveness and Transparent Pricing:
While the cost is a significant factor, it’s crucial to balance affordability with quality. Opt for a business that offers transparent pricing without hidden costs. Getting detailed quotes and comparing them with other service providers can help in making an informed decision that doesn’t compromise on the quality of the repairs.
Proximity and Local Knowledge:
Choosing a local business has multiple benefits. Proximity ensures faster response times, which is crucial in emergency situations. Additionally, local businesses are likely to have a better understanding of common issues in the area, such as weather-related damage, and may provide more tailored solutions.
Sustainable Practices and Materials:
In today’s environmentally conscious world, it’s worth considering businesses that use sustainable practices and materials. This not only contributes to the overall environmental well-being but can also result in longer-lasting repairs and better performance over time.
Comprehensive Services:
The business should offer comprehensive services encompassing inspection, repair, and post-repair maintenance. This ensures a holistic approach to fixing the leaking ceiling and can prevent future issues.
Customer Service:
Excellent customer service is a hallmark of a reputable business. Responsive, courteous, and helpful customer service reflects the overall ethos of the business and ensures a more pleasant and stress-free experience.
Choose Canadian Home Style for your Vancouver Bathroom Renovation.
Canadian Home Style is your family-owned and operated bathroom remodeler in North Vancouver, BC. We hold the highest standards in the industry and provide complete bathroom renovations across the Lower Mainland with an extended warranty. We always keep up to date with the latest trends and are proud members of the NKBA National Kitchen and Bath Association. In addition, we have won the Consumer’s Choice Awards back-to-back in 2021, 2022, 2023, and 2024 for our commitment to business excellence. We are considered one of Metro Vancouver’s highest-rated kitchen and bath design and renovation experts. Book now to visit our North Vancouver showroom, where you can get expert advice from one of our kitchen and bath designers. We’re happy to be a part of your journey with your next bathroom renovation project in Metro Vancouver.
Our mission is to help homeowners create beautiful homes that reflect their lifestyles while reducing energy consumption and conserving resources. We provide our clients with innovative products, services and education. We aim to become Canada’s leading sustainable kitchen and bath design and renovation provider. Our values include integrity, respect, honesty and transparency. These principles guide us as we strive to provide outstanding customer service.
We believe that our success depends on the success of our clients and their customers. We work hard to ensure our clients get the most out of their investments. Our team consists of highly skilled professionals who are experts in their field. They have years of experience working together and know what works and what doesn’t. They understand how to solve problems quickly and efficiently. We are committed to providing excellent customer service. We listen carefully to our client’s concerns and suggestions. We take these into account when planning and executing projects. We always strive to exceed expectations.
Why Choose Us?
Expertise in Mold Remediation: One of the primary concerns with a leaking ceiling is the growth of mold, which can pose health risks and compromise the structural integrity of your home. Canadian Home Style specializes in identifying and remedying mold problems that often accompany ceiling leaks. Their expertise ensures that not only is the leak fixed, but your home is also protected against mold-related issues.
Insurance Liaison: Dealing with insurance claims can be daunting. Canadian Home Style assists in this process, providing necessary documentation and support to help you navigate insurance claims related to ceiling leaks. Their experience with insurance protocols means they can offer guidance and support, making the process smoother and less stressful for homeowners.
Root Cause Analysis: Fixing a leak is more than just patching up a symptom; it’s about addressing the root cause. Whether it’s damaged roof shingles, compromised waterproofing, or structural issues, Canadian Home Style excels in diagnosing the underlying problems that lead to leaks. This comprehensive approach ensures a more permanent solution, preventing future issues.
Use of Quality Disinfectants and Materials: In the repair process, Canadian Home Style uses high-quality disinfectants to prevent mold and mildew growth, ensuring a healthy living environment. Moreover, their use of premium materials for repairs, be it wood for structural support or high-quality drywall, ensures durability and longevity of the repairs.
Specialized Services for Vancouver’s Climate: Being based in Vancouver, Canadian Home Style understands the local climate and its impact on homes. This local expertise is crucial in addressing issues like storm damage, which is a common cause of ceiling leaks in the area. They are equipped to handle repairs that withstand local weather conditions, ensuring your home remains safe and dry.
Drywall and Wood Repair Specialists: Ceiling leaks often lead to damaged drywall and wood. Canadian Home Style’s team of experts excels in repairing or replacing these materials, restoring the integrity and aesthetic of your home. Their craftsmanship in working with these materials ensures that repairs are not only functional but also seamlessly blend with the existing structure.
Comprehensive Cleaning Services: Post-repair, dealing with the aftermath like stained carpets or damp upholstery is essential. Canadian Home Style offers services like dry cleaning and carpet cleaning, providing a holistic solution that leaves your home clean and refreshed after the repair work.
Storm Damage Repair: In regions prone to heavy rains and storms, like Vancouver, ceiling leaks often result from storm damage. Canadian Home Style’s experience in repairing storm damage, including roof shingles and other structural components, makes them a reliable choice for such scenarios.
Services We Offer:
Main Areas of Service in British Columbia:
- Vancouver
- North Vancouver
- West Vancouver
- Burnaby
- Coquitlam
- Squamish
- Whistler
Did you miss our previous article…
https://canadianhomestyle.com/bathroom-renovation/how-to-install-toilet-flange/