Installing a toilet flange the right way
Installing a toilet flange is a crucial step in renovating your bathroom. To begin, you must understand the different types of flanges and gather the necessary tools for the installation process. These tools include a wrench, screwdriver, and measuring tape. In this section, we will guide you through the initial preparation steps, which involve measuring the diameter of the drain pipe and selecting the appropriate flange type for your specific bathroom setup.
Once you have gathered the necessary tools and materials, it’s time to start the installation process. First, measure the diameter of the drain pipe using a measuring tape. This measurement will help you determine the size of the flange you need. Next, choose the right flange type based on your bathroom setup. There are various options available, such as PVC flanges, cast iron flanges, and stainless steel flanges. Consider factors like durability, compatibility, and ease of installation when making your decision.
After selecting the appropriate flange type, it’s time to install it. Begin by removing the old flange, if there is one, using a wrench or screwdriver. Clean the area thoroughly to ensure a proper fit for the new flange. Then, position the new flange over the drain pipe and secure it in place using screws or bolts. Make sure it is tightly attached to prevent any leaks or instability. Finally, check for any gaps or misalignments and make necessary adjustments to ensure a secure and reliable installation. For more information, visit Home Depot’s guide on plumbing tools.
Types of Toilet Flanges and Selecting the Right One
Toilet flanges come in various types, including PVC, ABS, cast iron, and stainless steel. Each type has its own advantages and is suitable for different use cases. For example, PVC flanges are commonly used in modern homes due to their durability and ease of installation. This section will guide you in selecting the best flange for your bathroom, taking into consideration factors such as the type of flooring, the material of the pipes, and the local building codes.
When choosing a toilet flange, it is important to consider the type of flooring in your bathroom. Different flanges are designed to be compatible with specific floor types, such as concrete, tile, or wood. By selecting the appropriate flange for your flooring, you can ensure a secure and leak-free installation.
Another factor to consider is the material of the pipes in your plumbing system. PVC flanges are compatible with PVC pipes, while ABS flanges are suitable for ABS pipes. Cast iron and stainless steel flanges can be used with a variety of pipe materials. It is essential to choose a flange that is compatible with your existing pipes to ensure a proper fit and prevent any issues down the line.
Local building codes also play a role in determining the type of flange you should use. These codes vary by region and may specify certain requirements for toilet flanges. It is important to familiarize yourself with the local building codes and choose a flange that meets these regulations to ensure compliance and avoid any potential issues during inspections. Explore Lowe’s selection of toilet flanges for more details.
Preparing the Floor for Flange Installation
Proper floor preparation is essential for a secure and leak-proof flange installation. To achieve this, the floor area around the toilet drain must be thoroughly cleaned and leveled. In cases where the floor is uneven, leveling compounds or additional hardware may be required. This section provides detailed instructions on how to prepare the floor, including helpful tips for dealing with different types of flooring materials such as tile or linoleum.
Before proceeding with the flange installation, it is crucial to ensure that the floor is clean and free from any debris or obstructions. This can be done by thoroughly sweeping or vacuuming the area. Additionally, any existing adhesive or residue should be removed to ensure proper adhesion of the flange.
Once the floor is clean, the next step is to check for any unevenness. This can be done by using a level tool to determine if the floor is flat. If any uneven areas are identified, they should be addressed before proceeding further. Depending on the severity of the unevenness, leveling compounds or shims may be necessary to achieve a level surface.
When dealing with different types of flooring materials, it is important to consider their specific requirements. For example, when working with tile flooring, it may be necessary to remove any loose or damaged tiles and replace them before installing the flange. Similarly, when working with linoleum flooring, it is important to ensure that it is properly adhered to the subfloor to prevent any movement or shifting. Check out Floor & Decor’s floor installation tools for necessary supplies.
The Process of Installing the Toilet Flange
This section of the guide provides a detailed, step-by-step walkthrough of the actual flange installation process. It covers the attachment of the flange to the floor, the connection to the drainpipe, and the assurance of a watertight seal. Special attention is given to common challenges and troubleshooting tips, such as dealing with a broken flange or pipes that are misaligned.
To begin the installation process, the flange must be securely attached to the floor. This is typically done using screws or bolts, ensuring that it is firmly in place. Once the flange is secure, the next step is to connect it to the drainpipe. This can be done using a coupling or adhesive, ensuring a tight and reliable connection.
One of the most important aspects of flange installation is ensuring a watertight seal. This can be achieved by using a sealing ring or gasket between the flange and the toilet base. It is crucial to carefully align the flange and toilet base to ensure a proper seal, preventing any leaks or water damage.
In some cases, you may encounter challenges during the flange installation process. For example, if the flange is broken or damaged, it will need to be replaced before proceeding. Additionally, if the pipes are misaligned, adjustments may need to be made to ensure a proper connection. Troubleshooting tips and solutions for these common challenges can be found in this guide. For more DIY tips, visit DIY Network’s bathroom renovation section.
Sealing and Testing the Toilet Flange
After the installation process, it is of utmost importance to conduct a thorough test on the flange to check for any potential leaks and ensure a proper seal. This crucial step may involve the application of a suitable sealant and the implementation of a water test. In this section, we will provide valuable advice on the most effective sealants to utilize, the correct application techniques, and the proper procedure for conducting a leak test. Additionally, we will cover the necessary steps to take if a leak is detected.
To begin with, it is essential to choose the appropriate sealant for the specific flange application. Various sealants are available in the market, each designed for different purposes and materials. It is crucial to select a sealant that is compatible with the flange material and can withstand the operating conditions. Once the suitable sealant is chosen, the next step is to apply it correctly. This involves ensuring a clean and dry surface, applying the sealant evenly and in the recommended amount, and allowing sufficient time for it to cure or set.
After the sealant has been applied, it is time to perform a leak test to verify the effectiveness of the seal. This can be done by filling the flange with water and observing for any signs of leakage. It is important to carefully inspect all areas, including the joints and connections, to ensure a thorough evaluation. If a leak is detected during the test, immediate action should be taken to rectify the issue. This may involve reapplying the sealant, tightening any loose connections, or replacing damaged components. For sealant options, refer to Grainger’s plumbing sealants catalogue.
Maintaining Your Toilet Flange for Longevity
Regular maintenance of the toilet flange can help prevent future leaks and damage. By regularly checking the flange for any signs of wear and tear, such as cracks or corrosion, you can address these issues before they escalate and cause more extensive bathroom repairs. Additionally, cleaning the flange regularly using mild soap and water can help remove any buildup or debris that could potentially lead to clogs or leaks. However, if you notice that the flange is severely damaged or unable to be repaired, it may be necessary to consider replacing it to ensure the proper functioning of your toilet.
When it comes to routine checks for your toilet flange, it is important to inspect it for any visible signs of damage or deterioration. This includes checking for cracks, chips, or rust that could compromise the integrity of the flange. Additionally, pay attention to any loose or wobbly connections between the flange and the toilet bowl. These could indicate that the flange is not securely fastened, which can lead to leaks or even toilet instability. By addressing these issues early on, you can avoid more costly repairs down the line.
Cleaning the toilet flange is an essential part of regular maintenance. Using a mild soap and water solution, gently scrub the flange to remove any dirt, grime, or mineral deposits that may have accumulated over time. Be sure to also clean the surrounding area, including the toilet bowl and floor, to maintain overall cleanliness and prevent any potential odors. Regular cleaning not only helps keep the flange in good condition but also ensures proper hygiene in your bathroom.
If you notice any significant damage to the toilet flange that cannot be repaired, it may be time to consider replacing it. This is especially true if the flange is cracked, broken, or severely corroded. A damaged flange can lead to leaks, water damage, and even structural issues if left unaddressed. When replacing the flange, it is important to choose a high-quality replacement that is compatible with your toilet model. If you are unsure about the replacement process, it is recommended to consult a professional plumber who can ensure the proper installation and functionality of the new flange. For maintenance tools and supplies, visit Ace Hardware’s bathroom maintenance section.
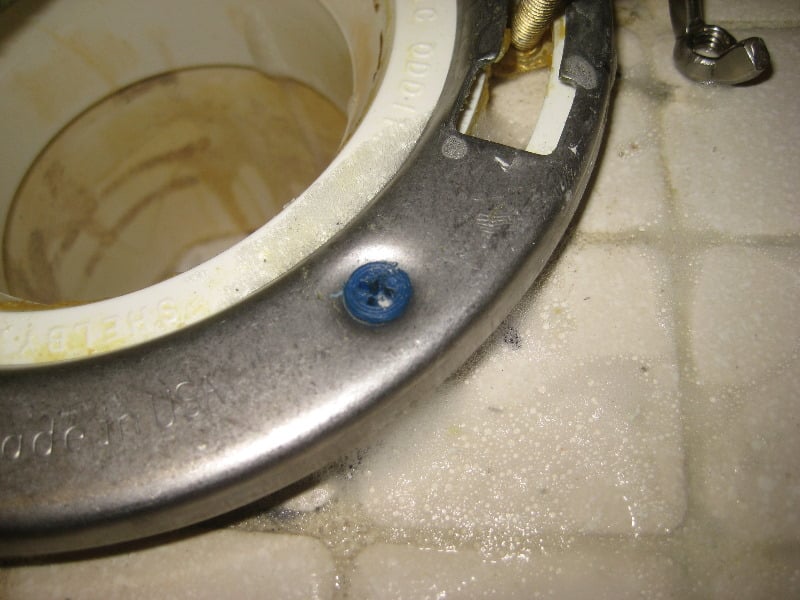
Fixing a leaking toilet flange
In addition to the obvious signs that you have a leaky toilet, a cracked flange can cause an even bigger problem: water backing up into the toilet bowl. You can often fix this problem yourself, especially if you have the proper tools. Cracked flanges can also cause water to pool in the bowl, which can cause foul odors to emanate from the toilet. To fix this problem, you will need to replace the flange. Make sure to buy the correct flange kit.
A leaking toilet flange can damage the flooring in a home. In some cases, it may lead to loose tiles and a major sewage spill beneath a raised floor. Even worse, the water can cause major damage to the wood structure under the floor and the floor joists and sub-flooring. To repair the leaking toilet flange, you must first replace the flooring, which may require hiring a plumber.
Repairing a leaking toilet flange can be relatively simple, especially if you have the parts on hand. However, a professional will be necessary if you don’t feel confident in your abilities. If the flange is leaking water, you should check the surrounding area for small pools of water. The floor around the toilet may also be spongy, and you may notice your finished flooring buckling.
Choosing a new toilet flange
If you’re considering replacing your old toilet flange in your bathroom, reading customer reviews is the best place to start. These reviews are an unbiased way to learn about the features and benefits of a particular toilet flange. Popular products typically get more positive feedback and are more popular, which means they’re a better choice for consumers. Manufacturers also benefit from the growing customer base. It’s important to check out customer reviews to ensure that you get the most value for your money.
The flange bolts from your old toilet can be reused if they’re in good shape. Before replacing your flange, measure your old one’s neck to ensure you’re getting the right size. The new flange should be level with the floor and have a comfortable neck. The new flange will also come with bolts and nuts to install it.
Flanges come in several types of materials. The most common type is made from PVC, which is relatively inexpensive and durable. Flanges made from copper can be rigid or soft. If you’re in the market for a more rigid toilet flange, you may need to install elbow joints. Copper has many benefits, including antibacterial and resistance to bacteria and mold. The downside is that copper is expensive and harder to work with.
Setting the height of a toilet flange.
A level surface is essential when installing a toilet flange. It supports the toilet and connects to the plumbing system of the home. If the flange isn’t level, the toilet may wobble, and the bowl may leak at the base. Here’s how to set the height of a toilet flange. The floor must be level for the flange to sit level. After determining the floor level, install the toilet and test its alignment.
Once you’ve made sure the floor is level, place the anchors in the four holes. If you use concrete, drill four holes into the floor and screw in the anchors. Then, set the new flange to match the pipe’s height. Be sure to get one that has a good depth and water-tight seal. After you’ve ensured the new flange is level, drill holes in the floor and secure the toilet.
Several factors can affect the height of a toilet flange. If the flange is too low or too high, it will leak water, rock back and forth when used, and eventually, break the floor. It will also cause the subfloor to rot, leading to mold growth. The proper height of a toilet flange is about 1/4 inch above the floor. Consider the type of flooring in your home and how high the flange should be.
Key Considerations When Installing Toilet Flange For Your Bathroom in Metro Vancouver.
Expertise in Plumbing Services:
One of the first and most crucial factors to consider is the expertise the business holds in plumbing services. This goes beyond just the ability to install a toilet flange. It encompasses their overall proficiency in bathroom plumbing, knowledge about different types of flanges (like PVC, ABS, cast iron), and experience with various plumbing tools. An adept business will have skilled professionals who understand the nuances of bathroom renovations and can provide guidance on the best practices for durable and efficient plumbing installations.
Quality of Bathroom Fixtures:
The quality of bathroom fixtures offered by the business is another important aspect. Since the toilet flange is a key component in the bathroom’s plumbing system, the quality of this and other related fixtures like toilets, pipes, and sealants must be top-notch. Businesses that stock high-quality, branded, or certified products are preferable. These products ensure longevity, better performance, and often come with warranties or guarantees, adding an extra layer of assurance for the homeowner.
Customer Service and Support:
Excellent customer service and support reflect a business’s commitment to its clients. This includes how well they handle consultations, their responsiveness to queries, and the support they offer during and after the installation process. A business that provides clear instructions, maintenance tips, and is readily available to address any post-installation issues is highly valuable. This aspect is particularly important for homeowners who are new to bathroom renovations and rely heavily on expert guidance.
Reputation in Home Improvement:
The business’s reputation in the local community, especially in Vancouver, is a telling indicator of their reliability and quality of service. A business that is well-regarded by local homeowners, has positive reviews, and is known for its expertise in home improvement projects, particularly bathroom renovations, is a safer choice. This reputation can be gauged through online reviews, testimonials, and even word-of-mouth recommendations.
Cost-Effectiveness and Transparency:
While cost should not be the only determining factor, it is undoubtedly significant. The ideal business offers a balance of quality service at a reasonable price. They should be transparent about their pricing, providing detailed quotations and avoiding hidden costs. Cost-effectiveness also means providing solutions that are not just affordable upfront but also cost-efficient in the long run, such as recommending energy-efficient fixtures.
Adherence to Building Codes and Standards:
Lastly, it’s essential that the business adheres strictly to the local building codes and standards in Vancouver. This ensures that all installations, including the toilet flange, are legally compliant, safe, and up to the city’s regulatory standards. Compliance reduces the risk of future legal or structural issues, making it a crucial factor in the selection process.
Choose Canadian Home Style for your Vancouver Bathroom Renovation.
Canadian Home Style is your family-owned and operated bathroom remodeler in North Vancouver, BC. We hold the highest standards in the industry and provide complete bathroom renovations across the Lower Mainland with an extended warranty. We always keep up to date with the latest trends and are proud members of the NKBA National Kitchen and Bath Association. In addition, we have won the Consumer’s Choice Awards back-to-back in 2021, 2022, 2023, and 2024 for our commitment to business excellence. We are considered one of Metro Vancouver’s highest-rated kitchen and bath design and renovation experts. Book now to visit our North Vancouver showroom, where you can get expert advice from one of our kitchen and bath designers. We’re happy to be a part of your journey with your next bathroom renovation project in Metro Vancouver.
Our mission is to help homeowners create beautiful homes that reflect their lifestyles while reducing energy consumption and conserving resources. We provide our clients with innovative products, services and education. We aim to become Canada’s leading sustainable kitchen and bath design and renovation provider. Our values include integrity, respect, honesty and transparency. These principles guide us as we strive to provide outstanding customer service.
We believe that our success depends on the success of our clients and their customers. We work hard to ensure our clients get the most out of their investments. Our team consists of highly skilled professionals who are experts in their field. They have years of experience working together and know what works and what doesn’t. They understand how to solve problems quickly and efficiently. We are committed to providing excellent customer service. We listen carefully to our client’s concerns and suggestions. We take these into account when planning and executing projects. We always strive to exceed expectations.
Why Choose Us?
Specialization in Flange Installation: Canadian Home Style possesses deep expertise in installing different types of flanges. Whether it’s PVC, cast iron, or any other material, their skilled professionals understand the nuances of each type and can provide the best solution tailored to your specific plumbing setup. This expertise ensures a secure and leak-proof installation, which is the backbone of any well-functioning toilet.
Comprehensive Toilet Services: Beyond just the flange, Canadian Home Style offers a complete range of toilet installation and maintenance services. This holistic approach means that they don’t just install the flange; they ensure that the entire toilet system, from the bowl to the tank, is perfectly aligned, secured, and functioning. Their service ensures that your bathroom’s plumbing operates efficiently and reliably.
Do-It-Yourself Guidance: For those who prefer a hands-on approach, Canadian Home Style provides invaluable DIY guidance. They can equip you with the right knowledge and tips to tackle toilet flange installation independently, which is a boon for homeowners who enjoy engaging in home improvement projects.
Provision of Essential Tools: The installation process requires specific tools, and Canadian Home Style comes prepared with everything from multi-tools to hammer drills and power tools. This array of equipment, including essentials like a putty knife, tape measure, and latex gloves, ensures a smooth and efficient installation process. Their professional-grade tools guarantee precision and reduce the risk of installation errors.
Expert Use of Power Tools: The use of power tools like the hammer drill is crucial in ensuring the flange is securely anchored. Canadian Home Style’s professionals are adept in handling these tools, ensuring that the flange is installed with the utmost precision and care, which is crucial for the long-term durability of your toilet’s plumbing.
Application of Putty Knife and Latex for Sealing: A putty knife is used for applying sealants or latex, which are essential in ensuring a watertight seal around the flange. The skilled use of these materials by Canadian Home Style prevents potential leaks and ensures that the connection to the sanitary sewer system remains intact and efficient.
Accurate Measurements: Accuracy is key in flange installation, and Canadian Home Style’s use of tape measures guarantees that the flange is positioned correctly relative to the toilet and the bathroom layout. This precision is critical for optimal toilet functionality and to avoid future plumbing issues.
Adherence to Sanitary Sewer and Plumbing Standards: Canadian Home Style adheres strictly to local sanitary sewer and plumbing standards. This adherence ensures that the installation is not only efficient but also compliant with regulatory requirements, reducing the likelihood of future legal or structural problems.
Services We Offer:
Main Areas of Service in British Columbia:
- Vancouver
- North Vancouver
- West Vancouver
- Burnaby
- Coquitlam
- Squamish
- Whistler
Did you miss our previous article…
https://canadianhomestyle.com/bathroom-renovation/three-types-of-shower-drains-and-how-to-install-them/